


How do I clean up duplicate photos?
Tips for Teekesselchen Plug-in. Original story is updated regularly and may be more accurate than this post.
Install the Plug-in
- Download the latest ZIP file and double-click to access the plug-in inside.
- Move the teekesselchen.lrplugin file somewhere safe.
- I keep mine in a Plug-ins folder with my presets and templates. To find this folder, go to Lightroom’s Preferences dialog > Presets tab and click the Show Lightroom Presets Folder button, then create a Plug-ins folder, and copy the plug-in inside.
- You might prefer to keep the plug-in next to your catalog, or another location you can easily find.
- In Lightroom, go to File menu > Plug-in Manager.

- Click the Add button, navigate to the teekesselchen.lrplugin folder/file (not the files inside it) and click Done.
A Little Bit of Prep
A little bit of prep work can save time sorting through the suspected duplicates later.
- Back up your catalog first. (We all make mistakes!)
- Fix any missing photos, if it’s possible to do so.
- Delete photos already marked with a reject flag. (If you don’t want to delete your rejected photos, you’ll need to tweak the plug-in settings to prevent it changing your flag status.) To do so:
- With the All Photographs collection still selected, go to Photo menu > Delete Rejected Photos to delete your rejected photos from the hard drive.
- Mark your externally edited photos (e.g. Photoshop PSD/TIFF files) with an Ignore keyword, so that they’re not identified as duplicates for deletion. To do so:
- Select All Photographs collection in the Catalog panel.
- Go to Photo menu > Stacking > Expand All Stacks to show all of the photos.
- Select Text Filters at the top of the Grid view. Set it to Filename contains -Edit (or whatever word you use to identify your externally edited files).

- Select all of the resulting photos using Ctrl-A (Windows) / Cmd-A (Mac).
- In the Keywording panel, add a new keyword. I used “Teekesselchen Ignore”.

Search for Duplicates
Next, you’re ready to run the plug-in and search for suspected duplicates.
- Decide which photos to search.
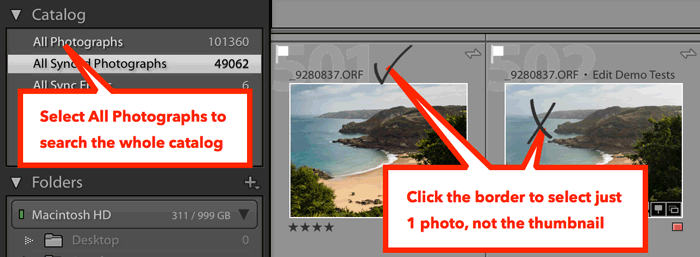
- The plug-in can search just the selected photos, selected folders/collections, or the whole catalog.
- In most cases, you’ll want to search the entire catalog, so select the All Photographs collection in the Catalog panel, and click in the border surrounding a thumbnail to ensure that only 1 photo is selected.
- Open the plug-in by going to Library menu > Plug-in Extras > Find Duplicates (not File > Plug-in Extras).
- Decide on plug-in settings. The default settings shown on the Summary tab are pretty good, but you can save some work by fine-tuning the settings for your own needs. I’ll leave you to read the documentation, but these are a few settings to look out for:
- On the Marks tab, you decide how the suspected duplicates are recorded in the catalog:
- If you use reject flags in your own workflow, and you decided not to delete the rejects from the hard drive, go to the Marks tab and uncheck Mark duplicates as rejected and Reset rejected flag to prevent the plug-in overriding your reject flags.
- If you use color labels in your own workflow, go to the Marks tab and uncheck Abuse color labels for sorting so that the plug-in doesn’t change your color labels.

- On the Rules tab, you can decide which metadata is used to identify duplicates. These determine how identical photos must be in order to be recognised as duplicates.
- To save time sorting through the duplicates, you can run multiple passes of the plug-in, initially using very strict criteria to find and delete photos that are almost certainly duplicates, and gradually expanding the criteria to find other possible duplicates.
- Lightroom only stores capture times to the nearest second, so photos shot in burst mode may be marked as duplicates. The plug-in can use ExifTool to access sub-second data (if it was recorded by the camera) however the process is slow, so if you don’t frequently shoot in burst mode, it’s usually quicker to exclude these manually later.
- For your initial pass, you’ll probably want to check Ignore virtual copies, but this option can come in handy when tidying up virtual copies created by the merge process.
- At the bottom, check Ignore Keywords and enter the keyword you added to your externally edited photos when you were preparing your catalog (e.g. Teekesselchen Ignore) so that these photos are skipped.

- On the Marks tab, you decide how the suspected duplicates are recorded in the catalog:
- Click Find Duplicates to start the process. This takes some time, but you can walk away from the computer while it works. My catalog of 105k photos took around 1 hour to complete.
Check the Results
The plug-in doesn’t delete any files. It just identifies suspected duplicates so you can decide which versions of the photos to keep.
Once the plug-in finishes, go to the Collections panel and select the Duplicates smart collection to view the suspected duplicates. If you left the settings on their defaults, the plug-in will have marked most photos as rejected, just keeping one copy of each photo unflagged.

Now it’s time to start making some decisions…
- When you find a photo you want to delete, select it and hit the X key to mark it as rejected.
- If you find a rejected photo you want to keep, hit the U key to unflag it.
As you’re looking through the suspected duplicates, there are a few things to look out for:
- File Types/Sizes – You’re generally going to want to keep the original raw file or JPEG, rather than an exported copy. The plug-in is fairly intelligent about selecting the best file, but it’s still worth double checking as you go through the photos. You can see this information in the Library module’s Metadata panel, with the pop-up set to EXIF and IPTC.
- Missing Photos – If you were unable to fix all of the missing photos before running the plug-in, take extra care when sorting through the photos. If some of the unflagged photos are marked as missing (with a rectangle or exclamation mark in a rectangle in the corner), you’ll probably want to mark it as a reject and keep one of the duplicates that can still find its original. In some cases, the “missing” photo will have the edits, in which case, keep both the missing photo and a duplicate original, and copy the metadata between photos using instructions in the next post.
- Burst Shots – The plug-in can’t usually tell which photos are burst shots, shot within the same second, so it may incorrectly mark them as rejects. As you scroll through, look out for these photos. When you find them, select them and hit the U key to remove the reject flag, as they’re not really duplicates and you won’t want to delete them. While they’re still selected, you could also uncheck the Duplicate keyword from the Keyword List panel, so that they’re removed from the smart collection and disappear from the current view.

- Edited Photos – As you’re scrolling through the photos, look out for versions of the photos that you’ve edited in some way – perhaps adding star ratings, title, caption, keywords, collection membership or Develop edits – and you’ll probably want to keep the edited version or copy the metadata onto the copy of the photo you’re keeping. (There’s more on copying metadata in the next post.)
The main places to check for edits are:
- Thumbnail
- Have you added flags, stars or color labels?
- Have you edited the photo, adding keywords, GPS location, collection membership, or Develop settings?

- Is the original file missing or damaged?


- Is the photo a virtual copy, shown by a triangle in the lower left corner?
- Metadata panel
- Have you added a Title or Caption?
- What’s the file type?
- Keywording panel
- Have you added keywords to the photo?
If the copy of the photo you want to keep is a virtual copy, it’s simple. First, promote the VC to Master status using Photo menu > Set Copy As Master and then delete the other copy.

But at this point, you may still have some photos where one copy of the photo has your Develop edits and another has your metadata. In another post, we’ll discuss how to copy metadata and settings from one photo to another, so you can then go back and delete the duplicate.
Delete the Rejects
Once you’ve finished sorting through the photos, it’s time to delete the duplicates. Select the All Photographs collection in the Catalog panel, then go to Photo menu > Delete Rejected Photos to delete them. They’re deleted from the hard drive, as well as being removed from the catalog.
Visit Link